Bethel-Burley
Here is a downstairs hall/guest bathroom and an upstairs master bathroom that I installed tile in along with the prep and shower pans.
The downstairs guest bathroom started out by removing the subfloor in the shower area and constructing a double dropped subfloor to accomidate for a thin single slope shower pan/trey running down to a cut to size linear wall shadow line drain. After I framed in a small floating style bench all the walls and floor got prepped with the Hydroblok system, keeping the substrate completely waterproofed and light weight. The floor got tiled with a 12"x24" porcelain tile that continued onto the shower pan. The walls got a 24"x48" porcelain tile with attention payed to the pattern to give a seamless pattern transition from each tile to the next. The inset niche backwall got a natural slate 1"x2" mosaic tile set and tile wall ends capped off with Schluter metal tile edge trim detail, all tile edges of the bench and niche recieved miter cuts for a clean installation.
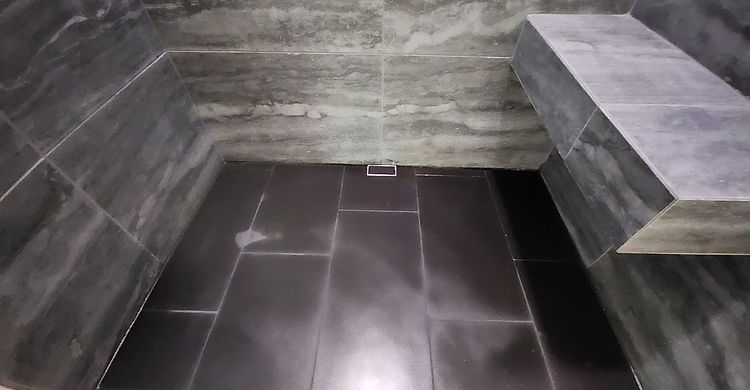
The upstairs master bathroom got a curbbed single slope large corner shower pan with a full length bench and a tiled grate linear drain. The floor recieved Schluter Ditra substrate and a 12"x24" porcelain tile, Installed on a straight set joint giving a modern appeal and making the bathroom seam visually longer. After the bench was framed in and the pan was properly screed to the linear drain, the walls got covered with Hydroblock wall board and then the entire shower was covered with Schluter Kerdi fabric for a double waterproofed substrate. 24"x48" porcelian tile was installed on the walls and bench on a straight stack set and additional time was taken to get the tile pattern to match up to create a seamless pattern from tile to tile, left to right, top to bottom and waterfalling the bench miter cut edge and corner. The floor tile was continued onto the single slope shower pan. Floor and walls were then grouted with a custom mixed color to get the perfect color.
.jpg)
Master Bathroom
Upstairs master bathroom had already had the previous fixtures, shower and tub torn out and the rough in plumbing done, ready for me to start building and install the large corner shower and tile flooring.


Homeowners had me frame in a full length bench. Here the pan is being constructed and Schluter Ditra membrane is being installed on the main floor. The walls will be Hydroblock board and tiled with a 24"x48" porcelain tile.
12"x24" floor tile on a straight set installed. Super format 24"x48" porcelain wall tile installed with extra attention given to the design pattern of the tile to make them match up left to right, top to bottom, continue thru the corner and waterfall the edge of the bench.
.jpg)

Extra attention to get design pattern of tiles to match. This particular tile took around 8 -10 additional hours of dry laying out the tile and fitting together, over lapping and cutting ends to achieve a seamless pattern flow. I call it "tile manipulation"
Almost all prepped for tile. The double dropped subfloor completed with a Hydroblock thin single slope shower pan/trey and an Ebbe/Hydroblock linear wall in shadow drain installed. Wall substrate done with Hydroblock 1/2" board and all joints sealed up with Hydroblock joint sealant.


Guest Bathroom
Small freefloating corner bench framed in, covered with Hydroblock substrate and joint sealant and then tiled with miter cut edges. In-shadow linear wall drain installation keeps the modern/contemporary appeal.