Failed Showers / Repairs
Here are some shower pans that I have been called on to properly repair/replace. All of these pans had one thing in common...they were obviously installed by someone who had no idea what they were doing and didn't quite realize just how many layers there are and steps that must be taken to construct a properly draining and working shower receptor (mudpan). The mudpans that Wauna Tile builds have eight layers just to get to the tile install stage, and include a moisture barrier and two waterproof membranes consisting of different materials. I prefer to build an "optional" Traditional style mudpan to which is recoginized by the T.C.N.A. , but can install any different pan in accordance with the each individual situation. If you have a shower pan that is failing or has failed, and think the entire shower has to be replaced, give a call to Wauna Tile and I can come give my professional analysis.

Linear Drain done Wrong

Here is a repair that apparently no one else could fix. The new homeowner (son-in-law) hired another contractor because he was "cheaper", After an hour, said contractor told the homeowner that he was in over his head. Wauna Tile got the call back and fixed the issue for good. Turns out the original homeowner was a real do-it-yourself kind of guy. His solution to a linear drain was to cut a piece of 2" ABS pipe in half, use rv roof waterproofing and hold it to the subfloor with metal straps. FAIL. Through the hole in the floor is the lower level of the home.

Here is a shower that I was called to take a look at. Apparently a larger local plumbing company was hired to put in a new shower system, to which the new valve, overhead, sprayers, and overall plumbing seemed proper to me. What I can't understand is why they decided to just dump a bunch of wet mixed mortar onto the middle of the shower, was this how the plumber thought you do a mudpan? I have no clue, and don't think i'll ever figure this out, but luckily for the homeowner I don't need to try to figure it out, Wauna Tile knows how to do it, and do it Properly!!!

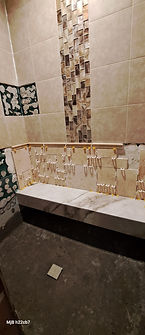
Almost done with this repair & Upgrade
With a few things left to do, this repair and upgrade has put new life into the shower. With the single tile freefloating bench with waterfall edge/face and the versailles like pattern natural stone capped with crown travertine this shower has gone from a cheap big bow store built shower to a timeless and much more inviting space.

Here is the fixed finished product, The old boxed in bench was torn out and a "free floating" bench was framed in and tiled with a single 34" x 72" porcelain tile that I put a miter cut on to "waterfall" the front face. The wall original wall tile was obsolete on a count that it was cheap poor quality big box store tile so I removed two more courses up and installed natural stone travertine cut down to four different sizes and set on a custom random versallies "like" pattern and split the two different tiles with travertine crown tile. I had to remove the old valve and in its place I framed in and preped a custom inset niche. I was able to salvage just enough of the tear out wall tile to fill in the cuts on the niche sides and to put in place of the corner shelves that also got torn out. Of course, a properly built "traditional mudpan got built and a curb framed in, which both the pan and curbtop recieved a Tsarus Almond hexagon porcelain mosaic tile. Although there is alot of different tile in this shower, it all ties together nicely and defiently brings much more elegance to what the shower formerly was.
Here is a shower that once again had an improperly built shower pan. The new homeowner contacted me to take a look and see what I recommended. He had already had the tile torn out and rot exposed. Luckily the problem area didn't spread up the wall too far so it could just be a new "traditional" shower pan install. After the homeowner took care of the rot and made the framing and subfloor structurally sound again, I installed a new mudpan with a moisture barrier, metal lath, preslope, 40 mil shower pan liner, final slope and 3 coats or waterproofing.

Here is the corner rot and obviously where this shower had water intrusion and standing water for some time. I never saw what the old pan consisted of but as I was building a correct pan, the homeowner told me that what he tore out was nothing at all like what I was installing.

With the new drain properly set, moisture barrier, lath, preslope and pan liner with peagravel around drain weep holes, the final slope got installed and after curing will get the type s mortar to square up the wall perimeter and curb.


Pan Fixed w/ Proper linear drain
Although the grout lines or the tile don't match up from the shower to the bathroom floor tile, I guarantee there will be no failure in the future. I first had to start from scratch so the subfloor was removed and properly "dropped". With the elevation need to slope the pan to T.C.N.A. tolerances. I packed in a traditional style shower receptor "mudpan" with a single slope and bonded drain base that got an actual linear drain attached.

A Work in Progress
With the unneccessary elements removed, the proper building process has begun. The subfloor got repaired and existing holes got square cut, blocked and filled in with 3/4" plywood and caulking. Traditional shower receptor "mudpan" is in the middle of installation with blocking and metal lath around the wall perimeter, new drain properly installed, pre-slope sand mix packed in, pan liner installed and attached to drain base with silicone at drain and pea gravel to keep weep holes from being clogged. Bench has already been framed in and extra re-inforced, waterproofed and tiled.
Properly Finished w/ Added Elegance


Now that all the layers of a properly built "traditional" shower receptor have been completed, the final layer of a liquid waterproofing membrane got painted on, leaving an area open around the drain so that any moisture that gets through the natural stone will make its way to the drain and not be blocked by the waterproofing, rather make its way through the sand mix final slope and through the peagravel and down the drain weep holes, which is exactly how this whole system is designed to work, and work it does!!!
Slate with corner rot
Here is the finished product, The new slate got presealed with an industrial heavy duty sealant and then another final seal after install and grout. I installed a tile top drain and also completely tiled the rounded face corner bench. This pan will have no future issues
Unexplainable
Satisfaction Guarantee
If for any reason you're not satisfied with my craftmanship when my final punchlist is complete, and I "hand over the keys" to you're new bathroom/shower/tile install, I will remedy and rework anything you don't like until you are completely satisfied.


